DOF exercise

A few weeks ago we got to play around with various lenses for our d.o.f. exercise.

Kit used:
Dedolight DHL4 3-head lighting kit [C]
50mm Nikon 1.4 DIGITAL [C]
Manfrotto 055CLB tripod [C]
Nikon 105mm 2.8 Micro [C]
Nikon D200 digital camera [C]
Nikon lens – Digital 200mm Micro Nikkor

Both images below taken using the 105mm – A/priority – f/4 – 1/60 sec – ISO 200 – W/B tungsten – focal length 70mm.

taken using the 105mm – A/priority – f/2.8 – 1/100 sec – ISO 200 – W/B tungsten – focal length 70mm.

Lens 200mm – A/priority – f/4.2 – 1/80 sec – ISO 200 – W/B tungsten – focal length 200mm.

f/4.2 – 1/125 sec – ISO 200 – W/B tungsten – focal length 200mm.

f/4.5 – 1/50 sec – ISO 200 – W/B tungsten – focal length 200mm.

Class deep in concentration… 🙂

Mario Testino

Earlier in the course I studied photographer Nan Golding. Over-whelmed with understanding her and her work I wanted to look at a photographer whose work I loved! Mario Testino has always been an inspiration and I’m always in awe of his pictures to say the least!

 Mario Testino

Master of Photography – World-renowned fashion and portrait photographer.

Born in Lima, Peru in October 1954, one of six children, to an upper middle class, Catholic family, his father was Italian and his mother is half Spanish and half Irish. Raised in an American school, Mario learned to speak English. When his father’s work as a property dealer took him to New York on business, Mario would go along with him, as his own personal translator. Mario’s love for fashion grew and he would return home dressed in the latest hippy trends.

He went on to study Law and International Relations in California, but never completed his studies. He moved to Lambeth, London with his best friend in 1976, unable to draw or design photography was Mario’s way into the fashion world. He made money waiting on tables and shot cheap portfolios for young wannabe models. He wasn’t technically minded and used only natural light, he would create the whole look, applying make-up and styling their hair.

In his early years as a photographer, he was greatly influenced by the work of Cecil Beaton (1904-1980), English fashion and portrait photographer, known for photographing the famous and fashionable all around the world. Determined to achieve what Beaton had, Mario worked relentlessly to achieve recognition, travelling between London and Paris, networking with other photographers. He would queue up with his camera at fashion shows relying on assistants to get him in – photographing models from the back of the room he rarely saw their shoes! Slowly he made his way forward until he managed to get close enough to see the whole look. His lucky break came when introduced to Gianni Versace by Madonna; he photographed an advertising champagne with great success. The nineties became Mario’s triumphant years, including his iconic pictures of the late Diana Princess of Wales shot for the cover of Vanity Fair in 1997, just months before her death.

He was developing his own style, and with his relaxed and unique way of connecting with people, in the way that other photographers could not, Mario was able to bring out that ‘something special’ in his subjects. Memories of his teen years spent partying on the beaches in Rio de Janeiro; still influence Mario’s style today. His pictures are alive; they’re about having a great time. He believes a fashion photo is only believable when the model wearing it, would wear it in real life.

In 2002 the National Portrait Gallery, London, invited Mario to stage an exhibition of his work – it’s their most successful exhibition in the galleries history.

With over thirty years in the business, Mario’s work has featured worldwide on the cover of many of the glossies; GQ, Vanity Fair and Vogue. He has worked on countless advertising campaigns for some of the biggest fashion houses – Calvin Klein, Hugo Boss, Valentino and D&G. Commissions include photographing Royalty, high society weddings and events and, more recently, Prince William and Kate Middleton’s engagement.

Mario had produced nine books of his work; his work has been exhibited in museums and galleries around the world. Been awarded for his outstanding achievements and charity work, among them a Doctor Emeritus from the University of Arts and was awarded an order of merit from the city of Lima, Peru.

Now at the top of his profession, Mario spends his time travelling all over the world – London, LA, New York, Paris Milan… He continues to amaze and captivate us with his chic and beautifully immoral images.
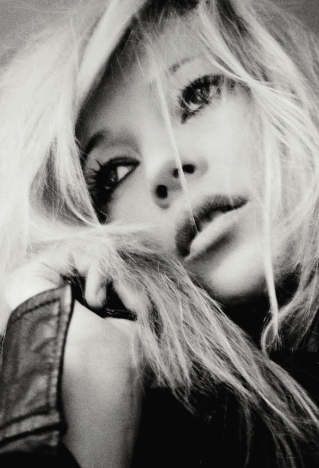
http://www.mariotestino.com/

Project: Light.

Given the task of capturing light, I found a book by Joe Cornish I’d been given a few years ago titled First Light. 

Cornish writes in his introduction: First, light. Everything else follows, for light is the language of photography as well as its raw material. As a poet uses words, so a photographer uses light. (Cornish.J  First Light. A Landscape Photographer’s Art. 2002).

This image is one of my favourites. The vivid greens and the way the light bursting through the clouds throws the jagged rocks into darkness, almost putting them into silhouette.

©Joe Cornish. ‘Old Man Of Storr’, Trotternish, Isle of Skye, Scotland. Ebony 455 field camera – Nikkor-SW 90mm f/4.5 – 1 sec @ f/22½

I’ve always liked the results you get when pointing the camera at the direct sunlight – if I can get lens flare I’m pretty excited!

Swarkestone, Derbyshire. 1/2500 f/22 – Taken just after 3pm – Conditions: bright/sunny intervals. The tyre tracks highlighted by the sun really help to emphasize the bend in the road.

Grass. 1/2000 f/25.

Pylon. 1/640 F/13 – Taken stood underneath the pylon holding the camera free hand – lining up the the cross in the metal was a bit of a challange but I’m really pleased with the result.

Pylon. 1/640 F/13

1/2500 f/22. I directed the sunlight through a gap in the pylon for effect.

1/640 f/13 Taken early evening at sunset (6.30pm)

Britannia Mill Library

Lesson two (Jan 30th) we were asked to meet in the library located on the 2nd floor of the Britannia Mill building on Macworth Road. I entered the building via the new entrance, walked down a few corridors and found the stairwell at the far end of the building.

As soon you enter the library you’re hit by that musty smell of decaying books. I was eager to find the Photography section and as I walked along the creaky floor I found the main book area. I ran my fingers across the spines, scanning for familiar authors; Eugène Atget, Bernice Abbot and Ansel Adams were all names of photographers I recognised from studying at college a few years ago.

Other students arrived, shortly followed by David our tutor. He gave us a detailed tour of the libraries facilities and resources available to us throughout the duration of our course.

David explained the differences between books, journals and reference material available for loan either for just one day for restricted items, two days, one week or the standard three weeks for other items. Reference copy books cannot be taken from the library at all.

You can borrow as many as twelve items at a time, plus additional e-books and online material. By logging onto derby.ac.uk/library, using your student ID number items can be reserved for collection and loaned items can be renewed up to 10 times. You can visit the other libraries at Kedleston Road, Derby and the Devonshire in Buxton and access their resources, items can be sent to Britannia Mill.

Books are stored in a decimal point number order – PRISM gives you the decimal shelf mark number of the book which corresponds to the labels on the shelves (from library guide) e.g. Photography related items are numbered 770… Still photography and film/movie making material are kept in the main book area while post production material such as Photoshop software guides are kept close to the restricted reference items.

After a brief introduction with the Library’s staff at the main counter we made our way to the self-service machines. On the occasion that the staff aren’t available, the machines allow you to book your items in and out by scanning them, along with your student ID card. Brilliant!

On the right hand side just through a set of double doors leading into the other half of the library – the way I came in via the back staircase, I was pleasantly surprised to see locked away in a glass cabinet, a collection of old and rare books and journals by artists too delicate and valuable to be taken away but with the library’s permission you can read through them on site.

The library supports subjects in Art, Design and Technology, Education, Health and Science and in this area you can find a lot of free print-outs of ‘How to…’ booklets on just about anything to help you with your course – ‘How to write an essay’ might come in handy!

The library holds a journal collection and current journals and magazines including Photographer Monthly and Grand Designs are available for reference. Quiet study rooms are available for working in groups. Computers, laptops, scanners and printers are available for use as a student. Photocopiers can be used by purchasing a photocopy card from the main counter.

After our tour of the library we were asked to each choose a couple of books by photographers we knew little or nothing about. One of the books I picked up was ‘I’ll Be Your Mirror’ by Nan Goldin. All I knew of Goldin was she’s an American photographer that photographed people! I totally underestimated her… I spent days looking at the hundreds images in the book; In short the snapshots are a record of Nan’s daily life through the 70’s, 80’s and 90’s. The condition of being human and the ability to survive and how difficult that is.

See more here: http://www.derby.ac.uk/files/a_guide_to_services_available3.pdf

Opening times (Term time only)

  • Monday-Thursday: 8.30am-9.00pm
  • Friday: 8.30am-6.00pm
  • Saturday: 10.00am-5.00pm
  • Sunday: 1.00pm-5.00pm

Light experiment before work

Having spent a couple of weeks playing around with different exposures I still hadn’t attempted light graffiti. This morning before work I decided to give it a quick shot! I placed the camera on the dining table and piled some books underneath to get the height. Pointed the camera towards the stairs about 8′ away and framed my shot…

30s f/16

I pressed the shutter release then moved quickly towards the bottom of the stairs – waving the glow stick behind me as I walked to the top. (This took about 8-10 seconds) I waited for the shutter to close before coming back down. A lot of light was flooding through the skylight windows and as much as I loved the results I wanted to try it somewhere darker.

I was interested in seeing how the result would differ in a space with little or no light. Positioning the camera at the end of the hall way, again using a few books to raise it about a foot off the floor, I closed all the doors leading off to the bedrooms and bathroom. Unlike a torch the glow stick had no on/off switch so I had to hide it in my pocket until ready for the shot.

I released the shutter, took the stick out of my pocket and waved it around in the upper area of the lens. I attempted to make a face as I wanted to create the illusion of a ghostly figure… this took about 8-10 seconds then I hide the stick back in my pocket and stood behind the camera for the duration. The figure I drew wasn’t as I imagined it but I thought the result was great! I think the light looks like a figure stretching over and looking into the camera.

30s f/16

30s f/14

I couldn’t stop! I went back into the sitting room and positioned the camera back on the table pointing towards the TV. I remember watching 80s horror movies featuring ghostly figures coming out of the TV. With this in mind I used the same technique and awaited the results… Freaky!

Snow!!!

The recent snowy downfall inspired some action shots. Snowball fights are action packed and with a fast enough shutter speed you can freeze a moment in time.

1/8000s f/4.8 – Chris taking a shot.

1/8000s f4.5 – Snowball just missing Andy’s face.

1/8000s f/4.2 – Chris and Andy helping with the task!

Garden at Midnight

For my next task I loaned a ‘sturdy’ tripod and set my camera up in the garden. To the naked eye it seemed quite dark so I was eager to see just how much light could be captured with a long exposure.

I started with a 30 second exposure time and increased the speed by 5 second intervals finishing at 3 seconds (sequence shown below). I was amazed just how bright the images came out. I didn’t expect the warm saturated pinks and oranges in the sky, and in the distance you can see the trails of light from the airplanes landing at the airport – I HAD managed to capture them after all… even if from a far!

The assignment stated no post production so below are the RAW images as they are:

Exp 30s f/7.1 ISO 400

The images below show subtle changes – the faster the shutter speed the wider the aperture. At 3 seconds the image has a lot more noise and shows less detail.

  • 25s f/7.1
  • 20s f/5.6
  • 15s f/5.6
  • 10s f/4
  • 5s f3.5
  • 3s f3.5

Disaster!

For my first exercise I wanted to photograph light trails. Living close to an airport I thought pictures of the airplanes taking off and coming into land would be a great way to start! Obviously with slower shutter speeds the camera needs to be kept perfectly still – The problem was I hadn’t used my tripod in years and after an unsuccessful couple of days searching for the quick release bracket which secures the camera to the tripod, I decided a little improvisation was needed! Using lots of sticky tape (should have stopped right there I know) I secured the camera to the tripod, carefully placed it in the car and made my way up to the airport. Rearing to go and full of anticipation on a freezing cold January evening I found a spot at the side of the road with a clear view of the runway, and with tripod and camera (precariously attached on top of it to say the least) in position I waited for my moment…

This test shot clearly shows how unsecure the camera actually was. Not wanting to admit defeat just yet, I fiddled around with the tape in hope that I could keep the camera still enough to get my shot.

(20s exposure)

Keeping the exposure at 20s I waited until the airplane was two or three seconds out of frame and released the shutter. Although I’d successfully captured the planes light trails it was clear that the whole shoot was a disaster! I was ill prepared and cold to the bone and after more shots with pretty much the same results I packed up went home.

Desktop Experiment

The first (and last) time I experimented with exposure times was a few years ago during college… It was time to dig out the camera manual!

Simple enough right?!… Shutter Priority Mode is a mode that allows you to set your shutter speed and where the camera chooses other settings (like Aperture) to ensure the shot is well exposed.

While the camera was resting on the desk I thought I’d have a play with the S setting. Using just a desktop lamp for light the two images below demonstrate how much light is captured during different exposure times.

Camera: Nikon D300 Lens: Nikon 18-200mm 1 3.5-5.6

Set at 1/250s the image on the left is dark and grainy with very little detail and has a yellow tone due to the poor lighting. The image on the right is in complete contrast – by slowing the shutter speed to 30s, the image is brighter, detailed and I was even able to capture movement by moving the tube of hand cream around.

Lunch break browsing…

While browsing the internet on my lunch break for more Slow-Shutter Speed photography I came across many more stunning images from light trails to blurred watery images, but this one really caught my eye…

“This series was taken in dark environments with a Nikon D40x and D70s mounted on a tripod whose shutter was open for 25 seconds on average. I used an LED flashlight to illuminate the figure during different moments as I directed his body through the frame. The light was used for about a second at a time only when I wanted to capture that particular movement within the frame.” – Jesse Suchoff